
Orbit 57894 Sprinkler Timer: A Comprehensive Manual Guide
This guide details the Orbit 57894 timer‚ offering easy-set logic for flexible watering programs‚ covering installation‚ programming‚ and maintenance procedures effectively.
Welcome to the Orbit 57894 Sprinkler Timer – a user-friendly solution for automated lawn and garden watering! This timer‚ brought to you by Orbit Irrigation Products‚ Inc.‚ simplifies maintaining a healthy landscape while conserving water. Designed with “easy-set logic‚” the 57894 model allows for the creation of customized watering schedules tailored to your specific needs.
Whether you’re a seasoned gardener or new to irrigation‚ this timer offers flexibility and convenience. This manual will guide you through every step‚ from initial setup and programming to advanced features and troubleshooting. It’s a powerful tool for efficient water management‚ ensuring your plants thrive without constant manual intervention. Prepare to experience effortless lawn care with the Orbit 57894!
What’s Included in the Box
Upon opening your Orbit 57894 Sprinkler Timer package‚ please verify that all components are present. You should find the Orbit 57894 Timer unit itself‚ designed for straightforward installation and operation. Included is a detailed user manual – this document! – providing step-by-step instructions for setup‚ programming‚ and troubleshooting.
Additionally‚ the box contains mounting screws and hardware necessary to securely attach the timer to a wall or hose bib. While batteries are not included‚ the timer requires AA batteries for operation. Ensure you have a fresh set readily available. Inspect all parts for any damage during shipping; contact Orbit customer support if anything is missing or defective before proceeding with installation.
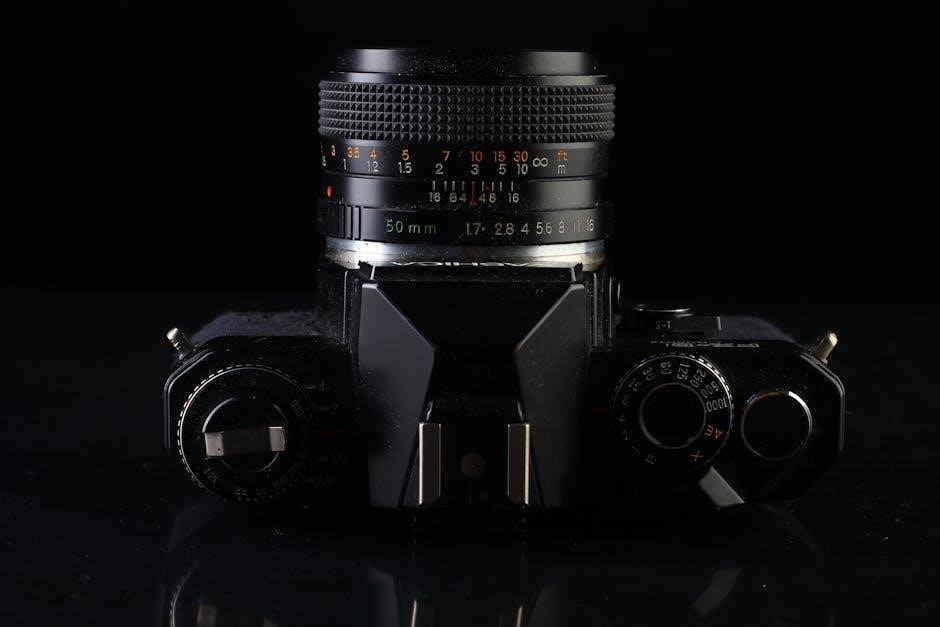
Timer Overview: Parts and Functions
The Orbit 57894 timer features a user-friendly interface designed for intuitive operation. The large LCD screen clearly displays the current time‚ date‚ and programmed watering schedules. Navigation is managed through several buttons: ‘Set’ for accessing programming modes‚ ‘Menu’ for cycling through options‚ and directional arrows for adjusting values.
The timer body houses the internal electronics and battery compartment. Multiple zone outputs allow control of several valves independently. A manual override button enables immediate watering‚ bypassing programmed schedules. The timer’s housing is designed for weather resistance‚ protecting internal components. Understanding these parts and their functions is crucial for effective programming and maintenance of your sprinkler system.
Setting Up Your Orbit 57894 Timer
Proper setup involves selecting a suitable location‚ securely mounting the timer‚ and correctly connecting valves and the water supply for optimal performance.
Selecting a Mounting Location
Choosing the right location is crucial for your Orbit 57894 timer’s longevity and ease of use. Ideally‚ select a spot close to a power outlet if you’re using the optional AC adapter‚ ensuring the cord reaches comfortably. The location should also be within range of your sprinkler valves.
Protect the timer from direct sunlight and extreme weather conditions; a shaded area is preferable. Avoid locations prone to flooding or standing water. Ensure the mounting surface is stable and can support the timer’s weight‚ especially when hoses are connected. Consider accessibility for programming and manual adjustments – you’ll want to easily reach the controls. A flat‚ vertical surface‚ like a wall or fence post‚ works best for secure mounting.
Mounting the Timer to a Wall or Hose Bib
Securely mounting your Orbit 57894 timer prevents damage and ensures reliable operation. For wall mounting‚ use the provided screws to attach the mounting bracket to a solid surface. Ensure the screws are appropriate for the wall material (wood‚ brick‚ etc.).
Alternatively‚ you can mount the timer directly to a hose bib; Hand-tighten the timer onto the bib‚ avoiding excessive force that could damage the threads. A slight application of Teflon tape to the bib threads can help create a watertight seal. Verify the timer is firmly attached and doesn’t wobble. Regularly inspect the mounting to ensure it remains secure‚ especially after exposure to weather elements.
Connecting the Valve(s) to the Timer
The Orbit 57894 timer utilizes standard hose-thread connections for easy valve integration. Each zone on the timer corresponds to a specific valve controlling a section of your irrigation system. Carefully connect the valve(s) to the timer’s designated zone outlets‚ ensuring a snug‚ hand-tight fit.
Using Teflon tape on the valve threads is recommended to prevent leaks. If you’re using multiple valves‚ clearly label each one to correspond with its programmed zone. Double-check all connections before turning on the water supply. Incorrect valve connections will result in water flowing to the wrong zones‚ potentially causing inefficiencies or damage.
Connecting the Water Supply
Before connecting the water supply‚ ensure all valve connections to the Orbit 57894 timer are secure and leak-proof. Attach a garden hose to the timer’s water inlet‚ and then connect the hose to your outdoor faucet or water source. Slowly turn on the water supply‚ monitoring for any leaks at the connections.
If leaks are detected‚ immediately turn off the water and tighten the connections further‚ or reapply Teflon tape if necessary. Avoid over-tightening‚ as this can damage the threads; Once the water is flowing without leaks‚ the timer is ready for programming and operation. Proper water supply connection is crucial for reliable irrigation.

Programming the Orbit 57894 Timer
Effectively utilize the easy-set logic to establish flexible watering programs‚ defining start times‚ durations‚ and zone assignments for optimal irrigation control.
Understanding the Programming Logic
The Orbit 57894 timer employs a straightforward‚ user-friendly programming logic designed for flexible watering schedules. It operates on a program-based system‚ allowing you to create multiple independent watering programs‚ each tailored to specific zones or plant types.
Each program consists of a start time‚ watering duration‚ and the days of the week on which it will run. You can assign individual zones to each program‚ enabling customized irrigation for different areas of your yard. The timer supports multiple start times per program‚ offering further flexibility.
Understanding this structure is key to maximizing the timer’s capabilities. It’s not a complex system‚ but rather a modular approach to irrigation control‚ allowing for precise and efficient water management.
Setting the Current Time and Date
Accurate time and date settings are crucial for the Orbit 57894 timer to function correctly. Begin by pressing the “Set Clock” button. The display will flash‚ prompting you to enter the current hour. Use the “Hour” and “Minute” buttons to adjust the values‚ ensuring AM or PM is correctly selected.
Next‚ set the date using the “Month‚” “Day‚” and “Year” buttons. Cycle through the options until the correct values are displayed. Confirm each setting by pressing the “Set” or “Enter” button.
Double-check the displayed time and date for accuracy. Incorrect settings will lead to inaccurate watering schedules. Proper setup ensures your programs run when intended.
Programming Watering Start Times
To program watering start times on your Orbit 57894 timer‚ first select the desired program (A‚ B‚ or C) using the “Program” button. Press “Set Time” and the display will flash‚ indicating you can input the start time for that program. Utilize the “Hour” and “Minute” buttons to set the desired start hour and minute.
You can program multiple start times per program‚ allowing for flexible watering schedules. After setting the first start time‚ press “Set Time” again to add another. Repeat this process until all desired start times are programmed.
Confirm each start time by pressing “Enter” or “Set”.
Setting Watering Duration
After establishing the watering start times‚ you must define the duration for each watering cycle on your Orbit 57894 timer. Within the selected program‚ press the “Run Time” button. The display will begin to flash‚ signaling you to input the desired watering duration.
Use the “Hour” and “Minute” buttons to precisely set the watering time‚ ranging from one minute to several hours‚ depending on your landscaping needs. Consider factors like plant type and soil conditions when determining the appropriate duration.
Confirm the set duration by pressing “Enter” or “Set”.
Assigning Zones to Watering Programs
The Orbit 57894 timer allows for independent control of multiple watering zones‚ optimizing water usage across your landscape. To assign a zone to a specific program‚ first‚ select the desired program number using the program selection buttons.
Next‚ press the “Zone” button. The display will prompt you to enter the zone number you wish to assign to this program. Utilize the number buttons to input the corresponding zone number.
Confirm your selection by pressing “Enter” or “Set”. Repeat this process for each zone‚ assigning them to the appropriate programs based on their watering requirements.

Advanced Features and Settings
Explore enhanced functionalities like rain delay‚ manual override‚ and seasonal adjust‚ providing customized control and efficient water management for your irrigation system.
Rain Delay Functionality
The Orbit 57894 timer incorporates a convenient Rain Delay feature‚ allowing you to temporarily suspend scheduled watering programs during periods of rainfall. This prevents overwatering and conserves water resources. To activate Rain Delay‚ navigate to the appropriate setting within the timer’s programming menu. You’ll typically be prompted to specify the duration of the delay‚ often ranging from hours to several days.
During the Rain Delay period‚ all programmed watering cycles will be automatically paused. Once the delay expires‚ the timer will resume its normal watering schedule. This feature is particularly useful for responding to unexpected weather events‚ ensuring your landscape receives only the necessary amount of water. Remember to deactivate the Rain Delay manually when conditions return to normal‚ or the timer will continue to postpone watering.
Manual Watering Override
The Orbit 57894 timer provides a Manual Watering Override function‚ granting you immediate control over your irrigation system‚ independent of the programmed schedule. This is incredibly useful for spot-watering specific areas or addressing unforeseen dryness. To initiate a manual cycle‚ access the override option within the timer’s interface. You’ll then select the zone you wish to water and specify the desired duration.
The timer will immediately activate the chosen zone for the set period‚ overriding any existing programmed schedules. Once the manual cycle completes‚ the timer will automatically revert back to its regularly scheduled programming. This feature offers flexibility and responsiveness‚ allowing you to tailor watering to your landscape’s specific needs. Remember to cancel the override if needed‚ preventing unintended prolonged watering.

Seasonal Adjust Feature
The Orbit 57894 timer incorporates a Seasonal Adjust feature‚ allowing you to globally modify your watering schedules to accommodate changing weather patterns throughout the year. As temperatures rise or fall‚ your landscape’s water requirements shift. This feature enables you to increase or decrease watering durations across all zones proportionally‚ without needing to reprogram each zone individually.
Access the Seasonal Adjust setting through the timer’s menu and input a percentage adjustment – positive for increased watering during hotter months‚ and negative for reduced watering during cooler‚ wetter periods. This simplifies water conservation and ensures your landscape receives optimal hydration. Regularly reviewing and adjusting this setting will maximize efficiency and promote healthy plant growth‚ adapting to the natural seasonal changes.
Winterization and Storage
Proper winterization is crucial to protect your Orbit 57894 timer from freezing temperatures and potential damage. Before the first frost‚ disconnect the timer from the water supply and any connected valves. Thoroughly drain all water from the timer housing and valve connections to prevent ice formation‚ which can crack components.
Remove the batteries to prevent corrosion during prolonged storage. Store the timer indoors in a dry‚ frost-free location. Avoid storing it in direct sunlight or extreme temperatures. When spring arrives‚ inspect the timer for any signs of damage before reconnecting it. Following these steps ensures your timer remains functional and ready for the next watering season‚ extending its lifespan considerably.

Troubleshooting Common Issues
This section addresses typical problems like power failures‚ valve malfunctions‚ time display errors‚ and programming mistakes for the Orbit 57894 timer.

Timer Not Powering On
If your Orbit 57894 timer fails to power on‚ begin by verifying the battery installation. Ensure the batteries are fresh and correctly inserted‚ observing the proper polarity (+ and -) as indicated within the battery compartment.
Next‚ check the battery contacts for any corrosion or debris that might be hindering a solid connection. Gently clean the contacts if necessary. If using an AC adapter (if your model supports it)‚ confirm it’s securely plugged into both the timer and a functioning power outlet.
Also‚ inspect the adapter’s cord for any damage. A faulty adapter can prevent the timer from receiving power. Finally‚ if none of these steps resolve the issue‚ the timer itself may be defective‚ and contacting Orbit customer support is recommended.
Valve Not Activating
If a valve connected to your Orbit 57894 timer isn’t activating during a programmed watering cycle‚ first confirm the valve is receiving power from the timer. Check the zone wiring connections at both the timer and the valve itself‚ ensuring they are secure and free from corrosion.
Verify the valve is not manually turned off. Some valves have a manual override switch. Also‚ ensure the programmed watering duration for that specific zone isn’t set to zero.
Inspect the valve solenoid for any visible damage or obstructions. A faulty solenoid can prevent the valve from opening. If the problem persists‚ try testing the valve with a different zone on the timer to isolate whether the issue lies with the valve or the timer itself.
Incorrect Time Display
An inaccurate time display on your Orbit 57894 timer can lead to incorrect watering schedules. Begin by verifying the timer’s battery level; low batteries often cause timekeeping errors. If the batteries are fresh‚ carefully re-enter the current time and date following the programming instructions in the manual.
Ensure you’ve selected the correct AM/PM setting during time setup. Double-check that the date is also correctly entered‚ as some timers synchronize time based on date information.
If the issue continues‚ try resetting the timer to its factory defaults and then re-programming the time and date. This can resolve any internal software glitches affecting the time display.
Programming Errors
Encountering programming errors with your Orbit 57894 timer is common‚ often stemming from incorrect button presses or sequence misunderstandings. If a program isn’t running as expected‚ carefully review each step of the programming process‚ comparing it to the manual’s instructions.
Pay close attention to start times‚ durations‚ and zone assignments. A common mistake is accidentally overlapping watering schedules for different zones. Try deleting the problematic program and recreating it from scratch‚ ensuring each setting is correct.
Resetting the timer to factory defaults and re-programming everything can also resolve complex errors.

Maintenance and Care
Regular cleaning‚ battery checks‚ and winterization are crucial for extending the life of your Orbit 57894 timer‚ ensuring reliable performance year after year.
Cleaning the Timer Housing
To maintain the longevity and optimal functionality of your Orbit 57894 Sprinkler Timer‚ regular cleaning of the housing is recommended. Begin by disconnecting the timer from both the water supply and the power source – either batteries or the electrical outlet.
Use a damp cloth‚ possibly with a mild soap solution‚ to gently wipe down the exterior of the timer housing. Avoid abrasive cleaners or harsh chemicals‚ as these can damage the plastic casing or affect the electronic components.
Pay particular attention to areas where dirt and debris may accumulate‚ such as around the display screen and the valve connection points. Ensure no water enters the timer’s internal components during cleaning. After wiping‚ use a dry cloth to thoroughly dry the housing before reconnecting the timer.
Battery Replacement
The Orbit 57894 timer utilizes batteries as a power source‚ and timely replacement is crucial for uninterrupted operation. When the low battery indicator appears on the display‚ or if the timer functions erratically‚ it’s time for a change.
First‚ disconnect the timer from the water supply. Locate the battery compartment‚ typically on the back or side of the unit‚ and open it according to the manufacturer’s instructions. Remove the old batteries‚ noting their correct polarity (+ and -).

Insert new‚ alkaline batteries of the correct size and type‚ ensuring proper alignment with the polarity markings. Close the battery compartment securely. The timer should now power on and function normally. Dispose of used batteries responsibly‚ following local regulations.
Protecting from Freezing Temperatures
To ensure the longevity of your Orbit 57894 timer‚ proper winterization is essential‚ particularly in regions experiencing freezing temperatures. Water left inside the unit can expand when frozen‚ causing significant damage to internal components and rendering the timer unusable.
Before the first freeze‚ disconnect the timer from both the water supply and the valve(s). Open the manual release valve (if equipped) to drain any remaining water from the timer’s internal passages. Remove the batteries to prevent accidental operation and potential damage.
Store the timer indoors in a dry‚ frost-free location. Avoid storing it in sheds or garages that are not adequately insulated. Proper storage will safeguard your investment and ensure reliable performance next season.

Warranty Information
Orbit’s limited warranty covers defects in materials and workmanship; details are available online or by contacting customer support for specific coverage terms.
Orbit’s Limited Warranty Details
Orbit Irrigation Products‚ Inc. provides a limited warranty on the Orbit 57894 Sprinkler Timer against defects in materials and workmanship for a period of one year from the date of purchase. This warranty does not cover damage resulting from improper installation‚ misuse‚ neglect‚ accidental damage‚ or unauthorized modification.
The warranty specifically excludes damage caused by freezing temperatures‚ electrical surges‚ or the use of incompatible accessories. To obtain warranty service‚ the purchaser must provide proof of purchase and return the defective timer to Orbit or an authorized service center. Orbit‚ at its option‚ will repair or replace the defective timer free of charge.
This warranty is non-transferable and applies only to the original purchaser. For complete warranty details and limitations‚ please visit the Orbit website or contact their customer support team directly.
Contacting Orbit Customer Support
For assistance with your Orbit 57894 Sprinkler Timer‚ Orbit Irrigation Products offers multiple channels for customer support. You can reach their dedicated support team via phone during business hours‚ typically Monday through Friday. Their website‚ www.orbitonline.com‚ provides a comprehensive FAQ section‚ troubleshooting guides‚ and downloadable manuals‚ including the 57894 model’s documentation.
Additionally‚ Orbit offers email support for more complex issues‚ allowing you to submit detailed inquiries with specific details about your timer’s problem. Live chat support may also be available on their website for immediate assistance. When contacting support‚ have your timer’s model number and date of purchase readily available to expedite the process.
Orbit is committed to providing excellent customer service and resolving any issues you may encounter with their products.